Pod 中的容器很可能因为各种原因发生故障而死掉, Controller 会通过动态创建和销毁 Pod 来保证应用整体的健壮性。而由于每次新 Pod 都会分配到新的 IP 地址,为了能让客户端找到并访问这个服务,Kubernetes 给出了 Service 这个解决方案。
六、Service 的创建和使用
1,Service 介绍
(1)Kubernetes Service 从逻辑上代表了一组 Pod,具体是哪些 Pod 则是由 label 来挑选。
(2)Service 有自己 IP,而且这个 IP 是不变的。
客户端只需要访问 Service 的 IP,Kubernetes 则负责建立和维护 Service 与 Pod 的映射关系。
无论后端 Pod 如何变化,对客户端不会有任何影响,因为 Service 没有变。
2,基本用法
(1)首先编辑一个配置文件 httpd.yml,内容如下:
多个资源文件可以都在一个 YAML 中定义,用“---”分割。这里我们将 Deployment 和 Service 都放在一个配置文件中:
Deployment 部分:启动了三个 pod,运行 httpd 镜像,label 是 run:httpd,service 将会用这个 label 来挑选 pod。
Service 部分:挑选那些 label 为 run:httpd 的 pod 作为 service 后端的,并且将 8080 端口映射到 pod 的 80 端口。
1 2 3 4 5 6 7 8 9 10 11 12 13 14 15 16 17 18 19 20 21 22 23 24 25 26 27 28 | apiVersion: apps/v1beta1kind: Deploymentmetadata: name: httpdspec: replicas: 3 template: metadata: labels: run: httpd spec: containers: - name: httpd image: httpd ports: - containerPort: 80---apiVersion: v1 # v1是service的apiversionkind: Service # 当前资源的类型为 Service。metadata: name: httpd-svc # Service 的名字为 httpd-svc。spec: selector: # elector 指明挑选那些 label 为 run: httpd 的 Pod 作为 Service 的后端。 run: httpd ports: # 将 Service 的 8080 端口映射到 Pod 的 80 端口,使用 TCP 协议。 - protocol: TCP port: 8080 targetPort: 80 |
(2)接着执行如下命令创建 Deployment 和 Service:
1 | kubectl apply -f httpd.yml |
(3)可以看到目前启动了三个 pod,pod 分配了各自的 IP,这些 IP 只能被 kubernetes Cluster 中的容器和节点访问。
1 | kubectl get pod -o wide |
(4)执行如下命令可以查看我们创建的 Service(名字为 httpd-svc),它被分配到了一个 CLUSTER-IP 10.104.166.77。
1 | kubectl get service |
(5)我们可以通过这个 IP 访问后端的 httpd Pod。具体转发到哪个后端 Pod,使用的是类似轮询的负载均衡策略。
1 | curl 10.104.166.77:8080 |
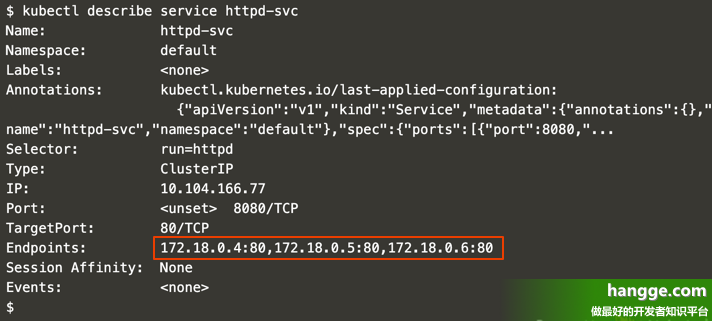
(6)执行如下命令可以查看 httpd-svc 与 Pod 的对应关系。
1 | kubectl describe service httpd-svc |
3,DNS 访问 Service
在 Cluster 中,除了可以通过 Cluster IP 访问 Service,Kubernetes 还提供了更为方便的 DNS 访问。 kubeadm 部署时会默认安装 kube-dns 组件。kube-dns 是一个 DNS 服务器。每当有新的 Service 被创建,kube-dns 会添加该 Service 的 DNS 记录。
(1)集群中的 Pod 可以通过 <SERVICE_NAME>.<NAMESPACE_NAME> 访问 Service。比如下面我们在一个临时的 busybox Pod 中访问之前创建的 httpd-svc 这个 Service。
1 2 | kubectl run busybox --rm -ti --image=busybox /bin/shwget httpd-svc.default:8080 |
(2)由于这个临时的 busybox Pod 与 httpd-svc 同属一个default 命名空间(namespace),可以省略 default 直接用 httpd-svc 访问 Service。
1 | wget httpd-svc:8080 |
4,从外网访问 Service
在之前的样例中,我们创建的 Service 通过 Cluster 内部的 IP 对外提供服务,这种方式只有 Cluster 内的节点和 Pod 可访问。
有时我们希望应用的 Service 能够暴露给 Cluster 外部,那么 Service 可以通过 Cluster 节点的静态端口对外提供服务。Cluster 外部可以通过 <NodeIP>:<NodePort> 访问 Service。
(1)要启用 NodePort,首先我们需要在 Service 配置中添加 type: NodePort。
(2)接着重新创建 httpd-svc 后可以发现,Kubernetes 依然会为 httpd-svc 分配一个 ClusterIP,不同的是 PORT(S) 变为了 8080:31512:
8080 是 ClusterIP 监听的端口
31512 则是节点上监听的端口(Kubernetes 会从 30000-32767 中分配一个可用的端口,每个节点都会监听此端口并将请求转发给 Service)
(3)外部网络通过任一节点 IP + 31512 端口都能访问 httpd-svc。
(4)NodePort 默认是的随机选择,不过我们可以用 nodePort 指定某个特定端口。比如下面指定使用 31111 端口。
原文链接:https://www.hangge.com/blog/cache/detail_2435.html


