今天,简单讲讲android里如何在app内部直接使用服务器进行版本更新。
昨天,我讲了如何使用应用市场进行版本更新。但是使用应用市场进行版本更新存在一个问题,就是app无法获取应用市场里app的版本信息,所以使用应用市场进行版本更新时,需要搭一个服务器给app可以获取到应用市场最新的app的版本信息。
这里大家其实想到了吧,既然可以通过服务器获取app的版本信息,那么也可以直接通过服务器下载最新的app进行版本更新,目前我看到大部分app是这样做的,比如应用宝,支付宝这些app。我之前查找了版本更新的资料也是这些内容,这里记录一下。
一.版本的基础知识
版本控制的属性包括versionCode和versionName。
(一)versionCode
版本号(versionCode) 是相对比较重要的一个属性。versionCode是一个Integer类型的值。所以大家在设置的时候,不要将versionCode设置的太大,最好不要超过Integer的取值范围(当然一般也是不会超过的),一般大家在发布自己的第一个应用到市场的时候,版本取值为1(versionCode=1),这也是目前典型和普遍的做法。然后,每次发布更新版本时可以递增versionCode的值。
(二)versionName
版本名(versionName) 一个值为String类型的属性,一般和VersionCode成对出现。VersionCode是方便程序开发者运行和维护Application而设置的一个有效的值。versionName是一个版本的描述,给用户看的,也是用户放在各个第3方平台上提供给使用者看的一个版本名,可以说是对VersionCode的解释和描述。一般格式可以为:1.1.2。(major.minor.point)的形式。
(三)版本控制小结
版本号(versionCode)是用于判断是否升级的,一般每次版本更新,版本号加一。如果获取服务器上的版本号比检测到本程序的版本号高,那么提示升级。
版本名(versionName)用于显示版本改变的幅度大小,比如从2.0.1改变为2.0.2可能只是修改了一个很小的debug,如果改变为2.1.0可能是新增了一些功能,如果改变为3.0.0可能是有很大幅度的修改,比如很多UI界面或功能的添加!
也就是版本号用于判断是否可以升级,而版本名用于显示給用户看!
(四)版本控制的文件位置
这个要区分你是用Eclipse开发还是Studio开发。
在Eclipse中本控制的属性的位置是Manifest.xml中,如:
<?xml version="1.0" encoding="utf-8"?>
<manifest xmlns:android="http://schemas.android.com/apk/res/android"
    android:versionCode="3"
    android:versionName="1.2.1"
    package="com.example.updateDemo">

    <application
        android:allowBackup="true"
        android:icon="@mipmap/ic_launcher"
        android:label="@string/app_name"
        android:theme="@style/AppTheme">

    。。。

    </application>

</manifest>
上面表示android的第三个版本程序,版本名:1.2.1
在Android Studio呢?也是可以在Manifest.xml中定义versionCode和versionName,但是这里设置是无效的!
需要在程序的build.grade文件中设置,图解:
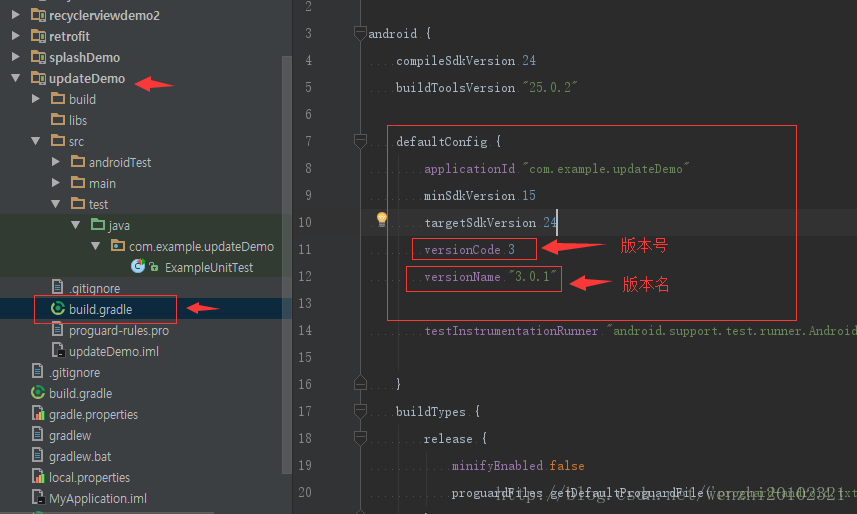
上面表示android的第三个版本程序,版本名:3.0.1
(五)版本信息的获取,代码
这里指的是获取运行中的程序的版本号,代码如下:
/*
 * 获取当前程序的版本名
 */
private String getVersionName() throws Exception{
    //获取packagemanager的实例
    PackageManager packageManager = getPackageManager();
    //getPackageName()是你当前类的包名,0代表是获取版本信息
    PackageInfo packInfo = packageManager.getPackageInfo(getPackageName(), 0);
    Log.e("TAG","版本号"+packInfo.versionCode);
    Log.e("TAG","版本名"+packInfo.versionName);
    return packInfo.versionName;
}
/*
 * 获取当前程序的版本号
 */
private int getVersionCode() throws Exception{
    //获取packagemanager的实例
    PackageManager packageManager = getPackageManager();
    //getPackageName()是你当前类的包名,0代表是获取版本信息
    PackageInfo packInfo = packageManager.getPackageInfo(getPackageName(), 0);
    Log.e("TAG","版本号"+packInfo.versionCode);
    Log.e("TAG","版本名"+packInfo.versionName);
    return packInfo.versionCode;
}
简单讲讲,其实版本更新就是首先获取到服务器的版本号与版本名称,然后获取app自己的版本号和版本名称,进行比较。如果服务器的版本号大于app自己的版本号,那么就进行http请求获取服务器的apk,进行下载。下载完成后就直接覆盖安装。
下面举一个使用服务器进行版本更新的例子:
该小程序的特点是,当有更新时,会弹出一个提示框,点击确定,则在通知来创建一个进度条进行下载,点击取消,则取消更新。
以下是详细代码:
1.创建布局文件notification_item.xml,用于在通知栏生成一个进度条和下载图标。
<?xml version="1.0" encoding="utf-8"?>
<RelativeLayout xmlns:android="http://schemas.android.com/apk/res/android"
    android:layout_width="fill_parent"
    android:layout_height="fill_parent"
    android:padding="3dp" >

    <ImageView
        android:id="@+id/notificationImage"
        android:layout_width="wrap_content"
        android:layout_height="wrap_content"
        android:src="@android:drawable/stat_sys_download" />

    <TextView
        android:id="@+id/notificationTitle"
        android:layout_width="wrap_content"
        android:layout_height="wrap_content"
        android:layout_alignParentRight="true"
        android:layout_toRightOf="@id/notificationImage"
        android:paddingLeft="6dp"
        android:textColor="#FF000000" />

    <TextView
        android:id="@+id/notificationPercent"
        android:layout_width="wrap_content"
        android:layout_height="wrap_content"
        android:layout_below="@id/notificationImage"
        android:paddingTop="2dp"
        android:textColor="#FF000000" />

    <ProgressBar
        android:id="@+id/notificationProgress"
        style="@style/ProgressBarHorizontal_color"
        android:layout_width="wrap_content"
        android:layout_height="wrap_content"
        android:layout_alignLeft="@id/notificationTitle"
        android:layout_alignParentRight="true"
        android:layout_alignTop="@id/notificationPercent"
        android:layout_below="@id/notificationTitle"
        android:paddingLeft="6dp"
        android:paddingRight="3dp"
        android:paddingTop="2dp" />

</RelativeLayout>
2.创建AppContext类,该类继承自Application。
package com.test.application;

import android.app.Application;
import android.content.Context;

import com.test.update.config.Config;

public class AppContext extends Application {
 private static AppContext appInstance;
 private Context context;

 public static AppContext getInstance() {
        return appInstance;
 }

 @Override
 public void onCreate() {
        // TODO Auto-generated method stub
        super.onCreate();
        appInstance = this;
        context = this.getBaseContext();
//        // 获取当前版本号
//        try {
//            PackageInfo packageInfo = getApplicationContext()
//                    .getPackageManager().getPackageInfo(getPackageName(), 0);
//            Config.localVersion = packageInfo.versionCode;
//            Config.serverVersion = 1;// 假定服务器版本为2,本地版本默认是1
//        } catch (NameNotFoundException e) {
//            e.printStackTrace();
//        }
        initGlobal();
 }

 public void initGlobal() {
        try {
            Config.localVersion = getPackageManager().getPackageInfo(
                    getPackageName(), 0).versionCode; // 设置本地版本号
            Config.serverVersion = 2;// 假定服务器版本为2,本地版本默认是1--实际开发中是从服务器获取最新版本号,android具体与后端的交互见我另///外的博文
        } catch (Exception ex) {
            ex.printStackTrace();
        }
 }
}
3.创建配置文件类Config.java,在这个类里面定义一些与版本相关的常量
package com.test.update.config;

public class Config {
 //版本信息
    public static int localVersion = 0;
    public static int serverVersion = 0;
    /* 下载包安装路径 */
    public static final String savePath = "/sdcard/test/";

    public static final String saveFileName = savePath + "test.apk";
}
4.编写更新服务类UpdateServcie.java
package com.test.update;

import java.io.File;
import java.io.FileOutputStream;
import java.io.InputStream;
import java.net.HttpURLConnection;
import java.net.URL;

import android.annotation.SuppressLint;
import android.app.Notification;
import android.app.NotificationManager;
import android.app.PendingIntent;
import android.app.Service;
import android.content.Intent;
import android.net.Uri;
import android.os.Environment;
import android.os.Handler;
import android.os.IBinder;
import android.os.Message;
import android.widget.RemoteViews;

import com.test.update.config.Config;

public class UpdateService extends Service {
 // 标题
 private int titleId = 0;

 // 文件存储
 private File updateDir = null;
 private File updateFile = null;
 // 下载状态
 private final static int DOWNLOAD_COMPLETE = 0;
 private final static int DOWNLOAD_FAIL = 1;
 // 通知栏
 private NotificationManager updateNotificationManager = null;
 private Notification updateNotification = null;
 // 通知栏跳转Intent
 private Intent updateIntent = null;
 private PendingIntent updatePendingIntent = null;
 /***
  * 创建通知栏
  */
 RemoteViews contentView;
 // 这样的下载代码很多,我就不做过多的说明
 int downloadCount = 0;
 int currentSize = 0;
 long totalSize = 0;
 int updateTotalSize = 0;

 // 在onStartCommand()方法中准备相关的下载工作:
 @SuppressWarnings("deprecation")
 @Override
 public int onStartCommand(Intent intent, int flags, int startId) {
        // 获取传值
        titleId = intent.getIntExtra("titleId", 0);
        // 创建文件
        if (android.os.Environment.MEDIA_MOUNTED.equals(android.os.Environment
                .getExternalStorageState())) {
            updateDir = new File(Environment.getExternalStorageDirectory(),
                    Config.saveFileName);
            updateFile = new File(updateDir.getPath(), getResources()
                    .getString(titleId) + ".apk");
        }

        this.updateNotificationManager = (NotificationManager) getSystemService(NOTIFICATION_SERVICE);
        this.updateNotification = new Notification();

        // 设置下载过程中,点击通知栏,回到主界面
        updateIntent = new Intent(this, UpdateActivity.class);
        updatePendingIntent = PendingIntent.getActivity(this, 0, updateIntent,
                0);
        // 设置通知栏显示内容
        updateNotification.icon = R.drawable.ic_launcher;
        updateNotification.tickerText = "开始下载";
        updateNotification.setLatestEventInfo(this, "QQ", "0%",
                updatePendingIntent);
        // 发出通知
        updateNotificationManager.notify(0, updateNotification);

        // 开启一个新的线程下载,如果使用Service同步下载,会导致ANR问题,Service本身也会阻塞
        new Thread(new updateRunnable()).start();// 这个是下载的重点,是下载的过程

        return super.onStartCommand(intent, flags, startId);
 }

 @Override
 public IBinder onBind(Intent arg0) {
        // TODO Auto-generated method stub
        return null;
 }

 @SuppressLint("HandlerLeak")
 private Handler updateHandler = new Handler() {
        @Override
        public void handleMessage(Message msg) {
            switch (msg.what) {

            case DOWNLOAD_COMPLETE:
                // 点击安装PendingIntent
                Uri uri = Uri.fromFile(updateFile);
                Intent installIntent = new Intent(Intent.ACTION_VIEW);
                installIntent.setDataAndType(uri,
                        "application/vnd.android.package-archive");

                updatePendingIntent = PendingIntent.getActivity(
                        UpdateService.this, 0, installIntent, 0);

                updateNotification.defaults = Notification.DEFAULT_SOUND;// 铃声提醒
                updateNotification.setLatestEventInfo(UpdateService.this,
                        "QQ", "下载完成,点击安装。", updatePendingIntent);
                updateNotificationManager.notify(0, updateNotification);

                // 停止服务
                stopService(updateIntent);
            case DOWNLOAD_FAIL:
                // 下载失败
                updateNotification.setLatestEventInfo(UpdateService.this,
                        "QQ", "下载完成,点击安装。", updatePendingIntent);
                updateNotificationManager.notify(0, updateNotification);
            default:
                stopService(updateIntent);
            }
        }
 };

 public long downloadUpdateFile(String downloadUrl, File saveFile)
            throws Exception {

        HttpURLConnection httpConnection = null;
        InputStream is = null;
        FileOutputStream fos = null;

        try {
            URL url = new URL(downloadUrl);
            httpConnection = (HttpURLConnection) url.openConnection();
            httpConnection
                    .setRequestProperty("User-Agent", "PacificHttpClient");
            if (currentSize > 0) {
                httpConnection.setRequestProperty("RANGE", "bytes="
                        + currentSize + "-");
            }
            httpConnection.setConnectTimeout(10000);
            httpConnection.setReadTimeout(20000);
            updateTotalSize = httpConnection.getContentLength();
            if (httpConnection.getResponseCode() == 404) {
                throw new Exception("fail!");
            }
            is = httpConnection.getInputStream();
            fos = new FileOutputStream(saveFile, false);
            byte buffer[] = new byte[4096];
            int readsize = 0;
            while ((readsize = is.read(buffer)) > 0) {
                fos.write(buffer, 0, readsize);
                totalSize += readsize;
                // 为了防止频繁的通知导致应用吃紧,百分比增加10才通知一次
                if ((downloadCount == 0)
                        || (int) (totalSize * 100 / updateTotalSize) - 10 > downloadCount) {
                    downloadCount += 10;

                    updateNotification.setLatestEventInfo(UpdateService.this,
                            "正在下载", (int) totalSize * 100 / updateTotalSize
                                    + "%", updatePendingIntent);


                    /***
                     * 在这里我们用自定的view来显示Notification
                     */
                    updateNotification.contentView = new RemoteViews(
                            getPackageName(), R.layout.notification_item);
                    updateNotification.contentView.setTextViewText(
                            R.id.notificationTitle, "正在下载");
                    updateNotification.contentView.setProgressBar(
                            R.id.notificationProgress, 100, downloadCount, false);

                    updateNotificationManager.notify(0, updateNotification);
                }
            }
        } finally {
            if (httpConnection != null) {
                httpConnection.disconnect();
            }
            if (is != null) {
                is.close();
            }
            if (fos != null) {
                fos.close();
            }
        }
        return totalSize;
 }

 class updateRunnable implements Runnable {
        Message message = updateHandler.obtainMessage();

        public void run() {
            message.what = DOWNLOAD_COMPLETE;


            try {
                // 增加权限<USES-PERMISSION
                // android:name="android.permission.WRITE_EXTERNAL_STORAGE">;
                if (!updateDir.exists()) {
                    updateDir.mkdirs();
                }
                if (!updateFile.exists()) {
                    updateFile.createNewFile();
                }
                // 下载函数,以QQ为例子
                // 增加权限<USES-PERMISSION
                // android:name="android.permission.INTERNET">;
                long downloadSize = downloadUpdateFile(
                        "http://softfile.3g.qq.com:8080/msoft/179/1105/10753/MobileQQ1.0(Android)_Build0198.apk",
                        updateFile);
                if (downloadSize > 0) {
                    // 下载成功
                    updateHandler.sendMessage(message);
                }
            } catch (Exception ex) {
                ex.printStackTrace();
                message.what = DOWNLOAD_FAIL;
                // 下载失败
                updateHandler.sendMessage(message);
            }
        }
 }
}
5.编写活动类UpdateActivity
package com.test.update;

import com.test.update.config.Config;

import android.support.v4.app.Fragment;
import android.app.Activity;
import android.app.AlertDialog;
import android.content.DialogInterface;
import android.content.Intent;
import android.os.Bundle;
import android.util.Log;
import android.view.LayoutInflater;

public class UpdateActivity extends Activity {

 @Override
 protected void onCreate(Bundle savedInstanceState) {
        super.onCreate(savedInstanceState);
        setContentView(R.layout.activity_main);
        checkVersion();
 }

 /**
  * 检查更新版本
  */
 public void checkVersion() {

        if (Config.localVersion < Config.serverVersion) {
            Log.i("hgncxzy", "==============================");
            // 发现新版本,提示用户更新
            AlertDialog.Builder alert = new AlertDialog.Builder(this);
            alert.setTitle("软件升级")
                    .setMessage("发现新版本,建议立即更新使用.")
                    .setPositiveButton("更新",
                            new DialogInterface.OnClickListener() {
                                public void onClick(DialogInterface dialog,
                                        int which) {
                                    // 开启更新服务UpdateService
                                    // 这里为了把update更好模块化,可以传一些updateService依赖的值
                                    // 如布局ID,资源ID,动态获取的标题,这里以app_name为例
                                    Intent updateIntent = new Intent(
                                            UpdateActivity.this,
                                            UpdateService.class);
                                    updateIntent.putExtra("titleId",
                                            R.string.app_name);
                                    startService(updateIntent);
                                }
                            })
                    .setNegativeButton("取消",
                            new DialogInterface.OnClickListener() {
                                public void onClick(DialogInterface dialog,
                                        int which) {
                                    dialog.dismiss();
                                }
                            });
            alert.create().show();
        } else {
            // 清理工作,略去
            // cheanUpdateFile()
        }
 }
}
6.添加权限以及将服务静态加载(在配置文件中加载)。
<uses-permission android:name="android.permission.INTERNET" />
    <uses-permission android:name="android.permission.WRITE_EXTERNAL_STORAGE" />
    <uses-permission android:name="android.permission.MOUNT_UNMOUNT_FILESYSTEMS" />
注册服务
<service android:name="com.test.update.UpdateService" >
        </service>
完整的AndroidManifest.xml文件如下:
<?xml version="1.0" encoding="utf-8"?>
<manifest xmlns:android="http://schemas.android.com/apk/res/android"
    package="com.test.update"
    android:versionCode="1"
    android:versionName="1.0" >

    <uses-sdk
        android:minSdkVersion="8"
        android:targetSdkVersion="8" />

    <application
        android:name="com.test.application.AppContext"
        android:icon="@drawable/ic_launcher"
        android:label="@string/app_name" >
        <activity
            android:name="com.test.update.UpdateActivity"
            android:label="@string/app_name" >
            <intent-filter>
                <action android:name="android.intent.action.MAIN" />

                <category android:name="android.intent.category.LAUNCHER" />
            </intent-filter>
        </activity>
        <service android:name="com.test.update.UpdateService" >
        </service>
    </application>

    <uses-permission android:name="android.permission.INTERNET" />
    <uses-permission android:name="android.permission.WRITE_EXTERNAL_STORAGE" />
    <uses-permission android:name="android.permission.MOUNT_UNMOUNT_FILESYSTEMS" />

</manifest>
简单讲讲,这个例子首先在启动app时弹出版本更新的提示框,点击更新后,会发送http请求下载apk文件,同时生成一个通知,每隔%10进度时更新通知,下载完成后,点击通知栏就可以进行版本更新。具体的内容比较简单,关于通知的内容我会另写一篇博客进行讲解。
源码下载:https://download.csdn.net/download/bzlj2912009596/...
android 如何使用服务器进行版本更新就讲完了。
就这么简单。